How to Install
FloodSaver® Slide-N-Fold® Pans
The front of the pan is identified by the FloodSaver® logo.
Prepare the unit
On a table or other convenient flat surface, place the unit with the S-N-F logo SIDE DOWN. Fold each side completely over, one side at a time, pressing down hard with the heel of your hand all along the "hinge." This will loosen the hinges and make assembly easier.Assemble the back and sides
(The panel with the FloodSaver® logo is the front of the unit; it will be folded up last, after the appliance is in place.) Fold up the BACK panel and one SIDE panel, pushing in the corner so that the 45-degree wedges come together. Align the holes and insert 2 screws into the holes from the outside of the pan.
Drill the Drain Hole
Determine the location for the drain, and drill an appropriate hole for the drain fitting using a hole saw TURNING BACKWARDS (counter- clockwise).Install the Pan
Put some construction adhesive on the matte black bottom of the pan. Set the pan in place and firmly press on the bottom to spread the adhesive. Install the drain and drain line.Install the Appliance and fold the 4th side
After allowing the adhesive to set, slide in the appliance and hook it up as appropriate. Finally, fold up the front side of the pan and secure it using the 4 remaining screws and nuts.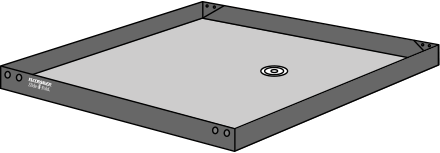
When sliding the appliance into the Slide-N-Fold® pan make sure the front side is flat against the floor and the corners are not caught in anyway by the appliance. We recommend placing of a piece of cardboard in the area which will protect the front side and can be removed after the appliance is in place.
PLEASE MEASURE CARFULLY!
Measure your appliance 3" from the floor for the inside dimension. Measure the room space available for outside dimension to determine the correct pan size.
Warranty Information and How to Order
Made in the USA
Home •
Products •
How to Order
Phone Orders: (8:30 AM - 4:30 PM Pacific Time)
1-800-929-9269 or 360-629-9269
FAX Orders: 360-629-2838 Order Form

Phone Orders: (8:30 AM - 4:30 PM Pacific Time)
1-800-929-9269 or 360-629-9269
FAX Orders: 360-629-2838 Order Form
Brochure
(123K PDF)
(123K PDF)
Spec Sheet
(463K PDF)
(463K PDF)